Ivylog
-
Posts
1,133 -
Joined
-
Last visited
-
Days Won
17
Content Type
Forums
Downloads
Articles
Gallery
Blogs
Events
Store
Everything posted by Ivylog
-

DETROIT DIESEL WON'T START
Ivylog replied to waterskier_1's topic in Engine, Transmission, Engine Cooling, & Hydraulics
Older engines the solenoid is in/on the injection pump. Newer engines with electronic injectors there is not a solenoid. Agree 30A is excessive...I use a 20A auto reset breaker/fuse on both after being put on the side of the road when the fuel fuse blew. The key to figuring it out was no lift pump when the key turned on...back on the road in an hour. -
DETROIT DIESEL WON'T START
Ivylog replied to waterskier_1's topic in Engine, Transmission, Engine Cooling, & Hydraulics
There are 2 fuses on the rear start board...left one is for the starter circuit and right is for the fuel solenoid. -
I had my doubts about using a air freshener, but citrus is now my go to cleaner after using it to remove the glue under the 3M film.
-
Citrus air freshener works well or anything with citrus oil in it.
-
I would splice a new bulb socket into the wiring.
-
Replace a step ball bearing slide on 08 Navigator.
Ivylog replied to Ivylog's topic in Interior & Exterior Care & Renovations
Coach Steps is now Lippert.
-
These steps are used on 07-09 Monaco Sig. EXe and Dynasty plus Beaver Marquis. Not a great idea to use ball beating slides where dirt can get into them.Bottom ball bearing slide on my double steps (Coach Step Inc)’ needed replaced as the steps would not close without some help... slide bent and ball bearings missing on one side. Another member posted that the 500lb slides were Knape & Vogt Kv8900 B22 22” ...$109 for 2 on EBay instead of that much for one from Monaco. Getting the steps removed was not too bad...removed by myself and only 6 bolts and several plugs. Had already built gravel ramps to get the MH higher having replaced the oil pan. Used a sharp chisel to remove the pop rivets plus a 1/8 Allen to remove 2 small bolts. The new slide was an exact replacement... no drilling. The new slide has a center recess (2nd picture) so there really isn’t any reason to remover the steps from the MH... all pop rivets can be installed from the outside unlike the one I removed.Had a little help getting the steps back in by myself. Did pressure clean the other 3 slides while I had the steps out. Naturally I decided to enclose the bottom and back of the steps after putting them back in... would have been easier when I had them out. Hopefully enclosing will keep most of the dirt out that clogs the slides. Fortunately it was still on the ramps so getting underneath was fairly easy. Bought 2 $6 plastic sign boards (19X24”) at H D. Used the metal legs to pin the 2 boards together and taped them together. Cut it down to a 30.4X24” piece so it would slide in on top of the 2 angle iron cross braces. Taped it in place and put the 8.6X24 piece across the back and taped up the 6” hole at the back...needed a 30” piece to fill completely. Painted it black not that you can see it.


-
Not sure a tech would think to pivot the hitch...took me awhile to come up with that idea and I wasn’t sure it would work. The drip was less than 2 oz in 2 months, but if the 2 patches came off you could ruin a engine before someone behind waved you over. I wasn’t to concerned about the JB weld coming off because after grinding the 3 U, I put the cutoff disk on and cut groves in both sides of the U. The first pan I found was $1500 but I kept searching using some of the #s from it. Amazing what all you can find today on the internet.

-
Took almost that long to get the SS flex pipe off the muffler’s pipe without destroying it. There was 6” of pipe inside the flex so I cut 3” off of the solid pipe... insurance that I’ll never have to take it apart again.

-
Cracked the corner of the aluminum oil pan going into a gas station on our 08 HR Navigator...didn’t think anything about the dip going into it. This was the 3rd station in Rawlings WY...1st out of diesel, 2nd ran out at 47 gallons...lucky me. Was able to grind a U in all 3 directions and JB weld it up enough to finish our trip out West. Even with a fiberglass patch over the JB it still leaked slightly. Decided to replace instead of trying to TIG weld the oil saturated aluminum. Found a used pan (rare and nothing like a truck’s) for $600. Made gravel ramps to get the back up enough to have more room to work. Naturally the exhaust and the hitch were in the way of getting the bolts out...cut Vs into the plate that holds the engine mount to get enough room to get those bolts out on the front of the engine. Finally got all the bolts out BUT the front of the oil pan could not drop down enough to clear the oil pump as it was hitting the hitch. Look into raising the front on the engine up but would have to remove the front pulley to get to the 2 large motor mount bolts. Decided angling the hitch (remove 6 of the 8 bolts holding it on) and jack the ball up changing the angle (lowering the hitch) enough that the pan came off. Hooked a shop vacuum to the crankcase vent so I could add a valve to the drain saving the oil with only 3K miles on it. Will start carrying one as instead of dumping 12 gallons of oil it would have let me patch it without loss of oil and the cracks would be dry.

-
For the second time I’ve had to replace the two diodes on the bird board in the 04 Dynasty. First time they shorted out...back feeding power so the engine would not shut off. This time they totally melted so replaced each one with three 6A diodes. Fortunately the direction is marked on the board.

- 1 reply
-
- 1
-

-
14 years with a 04 Dynasty...used to raise the tag if making multiple tight turns. Did a test raising and not...made no difference. Haven’t raised the tag in 7+ years. New rig (08 Navigator) is heavier so putting 31,000 lbs on the drive is not a great idea.
-
08 Monaco/HR window manufacturer???
Ivylog replied to Ivylog's topic in Body, Awning, Roof, Slides, & Steps
The pictures were to determine the tint. The window is unusually large at 29.5 H X 62 W...we have 3 of them. Don’t understand why anyone would buy the latest frameless windows that open 20%. -
08 Monaco/HR window manufacturer???
Ivylog replied to Ivylog's topic in Body, Awning, Roof, Slides, & Steps
Update: even though the glass has Apex on it, it’s not the company in PA. I was not the first to call them. Took accurate measurements and several pictures of the window pane and Sun Coast Designs (Hudson, FLa) is cutting and sending it off to be tempered... they thought they might have it in stock, not. Will stop by after Christmas on our way south and have them install. Should not rely on memory ... glass has EXCEL on it. -
08 Monaco/HR window manufacturer???
Ivylog replied to Ivylog's topic in Body, Awning, Roof, Slides, & Steps
Update: even though the glass has Apex on it, it’s not the company in PA. I was not the first to call them. Took accurate measurements and several pictures of the window pane and Sun Coast Designs (Hudson, FLa) is cutting and sending it off to be tempered... they thought they might have it in stock, not. Will stop by after Christmas on our way south and have them install. -
Fix for door arm after 16 years.
Ivylog replied to Ivylog's topic in Body, Awning, Roof, Slides, & Steps
Dennis, unlike you, we are only half timers so not as much use as FTimers gives it. Will be interesting to see how long it lasts although it’s now our daughter’s so even less use. I had to adjust the one on our 08 Navigator when we got it 2 years ago. ..still holds the right amount. Time will tell. Hope you’re doing well in these interesting times. We just got back from a month out West. -
Fix for door arm after 16 years.
Ivylog replied to Ivylog's topic in Body, Awning, Roof, Slides, & Steps
10 minutes adjusting over 14 years and now 20 minutes fixing...$260/ hour by my math and I doubt you replaced in less than 30 minutes. Different strokes for different folks. My point is “what do you have to loose” beating on it??? -
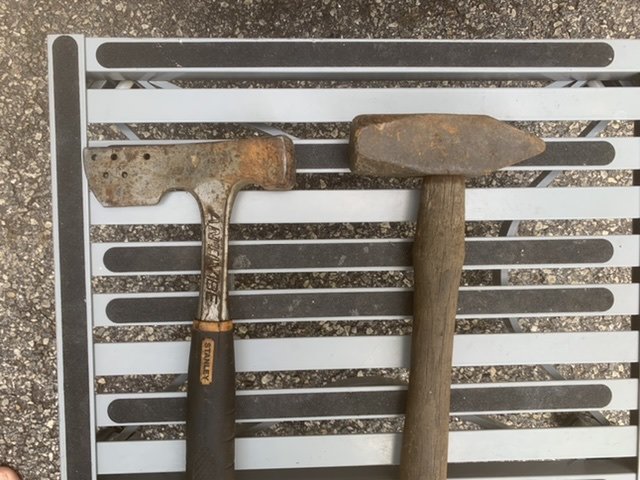
I’ve had to bend up the portion that sticks out 3 times in 16 years on the 04 Dynasty that’s still in the family. Recently that didn’t work well... pivot is very loose. I know others have replaced the pivot and/or added a bigger dimple or even replaced with a gas strut. These solutions seem overkill but I decided to remove it and see what was needed. Could not remove it easily as the door mount is pop-riveted to the top of the door, So, I got two heavy hammers and tightened the pivot. Took longer to find two hammers of my liking than the 10-12 times of hitting it to get it tight again. Now it’s probably only good for another 14 years. I’ve found a pipe wrench works the best for bending the end that sticks out... had to bend it back down to get the door to shut.

-
08 Monaco/HR window manufacturer???
Ivylog replied to Ivylog's topic in Body, Awning, Roof, Slides, & Steps
Thanks for all the leads....been on the road from MT back to GA. Car was passing opposite direction on a very clean road, when a very load crack...almost like a small cal gun going off. Impact was high on the sliding portion of the window, over 8’ high. A glancing blow that high up would not break it. I think it was a metal ball out of a slingshot. Tried the RV fog doctor in AR... have the #s off the identical window but they would have to make a pattern from the other half, cut a new one and send it off to temper...6+ weeks. May try the place in Hudson Florida. -
Had the outer pain of a side window shatter...tempered glass. These are the thin dual pain with a small air space. Trying to find the manufacturer. Thanks
-
Cummins ISX Engines
Ivylog replied to throgmartin's topic in Engine, Transmission, Engine Cooling, & Hydraulics
Yes, the pictures of the broken #6 valves has chunks of the outside perimeter ( sealing surface) missing. I’ve been told a 1.25” metal freeze plug fits nicely into the EGR tube where it bolts to the engine intake tube. -
Cummins ISX Engines
Ivylog replied to throgmartin's topic in Engine, Transmission, Engine Cooling, & Hydraulics
I learned of the ISX #6 intake valve issue a couple months after buying a 08 Navigator with a 06 ISX 525 engine 2 years ago. A higher % of MHs are having this problem than trucks and the higher HP (600-650) are dropping the valve more often. They are not snapping the valve off, the perimeter of the valve breaks off usually getting the piston and the turbo. I know of two 525 HP, 06 or older, that have dropped #6. Hopefully the better valves and seats will stop the acid created by the EGR gasses from weakening the intake valves...$20K if you do it preimptpley and $30+K after it breaks. the EGR -
The original GPS in my 08 Navigator works well and anytime we get near a big city the DW pulls up Waze on her phone and we use it to navigate as it has the latest roads and traffic conditions. I added Silverleaf as a overlay on the backup camera which is on the Kenwood display. Costed more than the one that needs its own display/computer/IPad.
-
With the true center engaged your slop is all in the Sheppard as it’s keeping the tie rod from moving. I had that muck slop in the new to me 08 Navigator and after 3 hours I crawled under and adjusted it to less than 1/2”. Previous owner installed a Safe-T-Plus which after 4K miles I removed as I found it made driving tiring compared to the 88K miles on the same chassis. I made an adjustable mount so I can adjust it on the fly to compensate for cross winds. I would start with a TRW keeping the true center.
-
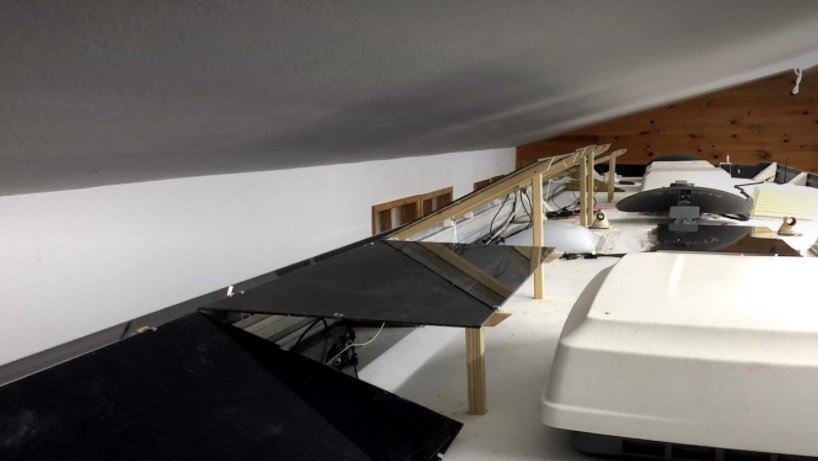
If you have a rig with the raised side rails, mounting the panels on it makes for easy tilting. I made my own mounts out of aluminum U channel and wooden supports. 7 tilt and 2 fixed for 990W. There was some concerns (not by me) that the panels would raise up at speed. I put small pieces of paper under the ends of the supports and they were still under after a high speed test run.