


Paul J A
-
Posts
1,194 -
Joined
-
Last visited
-
Days Won
14
Content Type
Forums
Downloads
Articles
Gallery
Blogs
Events
Store
Everything posted by Paul J A
-
Weight/Pressure per tire/TPMS/Tire Valve Extensions
Paul J A replied to millionroy's topic in Tires & Wheels
"THE" RV Rally to attend. A must for any coach brand owner. The knowledge group and participation by so many RV Company MFG's and vendor entities is reason alone to attend. With the cost of fuel today, it makes the most sense. -
This is a C & P of information i recieved from, and was posted on this site by Richard Smith. Excellent job, and you will find it very informative. It is in the "parts section" of this site as well. HWH Air Leveling System There are two photos of the old HWH Air Compressor which sits up high on a platform to the rear of the front axle just in front of the first bay containing the diesel and LPG tanks. The post below is a copy of the follow-up post I had made after completing the project including photos of the new compressor and rebuilt platform. Just to close out this thread with a follow-up, some photos and description of what I did to relocate the failed air compressor for the HWH Air Leveling System. After the complete unit was removed from under the coach where it was housed in a cage just to the rear of the front axle (VERY poor location - what were they thinking????) I removed the defective air compressor, relay and pressure switch. I then verified that the air/moisture spitter valve still worked by hooking it to a 12 VDC battery. I removed the filter above the valve and that did not need any further maintenance so I replaced it without any maintenance. I then cleaned up the base and proceeded to install the three new components. I had previously purchased a new air compressor, Viar Model 450C, an Emerson Relay Model 120-105711 and a Viair Pressure Switch Model 90100 which is On @ 90 psi / Off @ 120 psi. All three were obtained from Amazon. I also purchased 10 feet of 3/8 air line, one air-line union-coupling, some wire and split loom from the local NAPA store. I extended the two wires using crimp connectors and heat shrink. I installed the air-line coupling onto the line coming from the rear of the coach that goes to the rear 6 pack valves and also hooked it to one end of the new air-line. I then removed the old short air-line coming from the front 6-pack valves and attached the other end of the new air-line to the 6-pack valve. I used spilt-loom to cover all of the wires and air-lines for protection. All of those extensions were routed through a chassis frame which went directly into the adjacent bay where the diesel fuel and LPG tanks were located and where the new location will be for the air compressor. I had previously constructed a wooden shelf over the passenger side of the LPG tank which will hold the air compressor unit. The Viar Air Compressor came with rubber isolators but I added the springs that were used on the old Thomas Air Compressor to the mounting also. I also used some new springs between the base of the unit and the shelf to help further isolate and help dampen any vibrations coming from the compressor. I positioned the complete unit so it was easily accessible for routine maintenance if needed. Due to my installation of the compressor unit onto the wooden shelf I installed a ground wire from the metal base of the unit to the chassis to form the ground needed to run the system. I have attached photos of the rebuilt base unit installed in its final resting place. I am VERY pleased with the outcome and appreciate all of the help from my Workamper neighbor who was hired to do all of the work under the coach while I assisted him from outside with tools and materials. I am now able to re-level the coach without having to start up the engine to air up the system plus I no longer will have to worry about the air compressor failing once again from exposure to the elements, road debris and whatever it was exposed to in its previous location. Reply Reply All Forward
-
Water & Holding Tanks, Skylights & A C Shrouds & More https://www.eztopsworldwide.com/ https://www.icondirect.com/
-
SOS in the summer of 2008. We were full timing. Paid $4.89.9 , which it topped out at. The only difference betweed bitch and itch is ONE letter. Park it or pay it. Gument made commitments. WE eat the reprocusions. SOS.
-
You will enjoy spending some time on this site. https://www.marshallexcelsior.com/ Great old line U S A Co. which makes a complete line of product you can consider when addressing the various opportunity's of using the L P you carry with you, by any container.
-
tire pressure 20-30 psi Tire Pressure Rise?
Paul J A replied to WisMonarch's topic in Tires & Wheels
I really wish some of the ego's would diminish. -
During our years of full timing, we took U S 90 from San Antonio to Van Horn many times. A great highway ,and very little traffic. It used to be the Class "A" federal highway for all tuck freight traffic. A very relaxing scenic experience.
-
Congratulations and SAFE TRAVELS. Please consider a https://truckomat.com/ truck wash in your travels. The best we found in 10 years full timing. The traveling gantry is awesome.
-
I would contact Zip Dee or Girard. Sooner than later NO parts be available. except from salvage yards.
-
Local trucker bought my ---8--- 295/80/22.5 for 125$ each. The tire shops know who buys them.
-
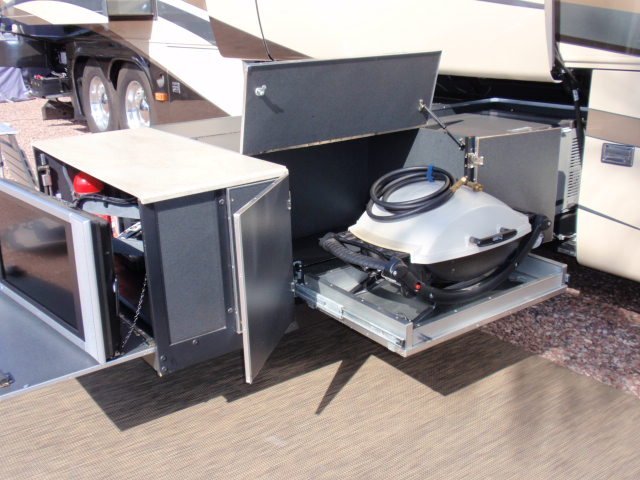
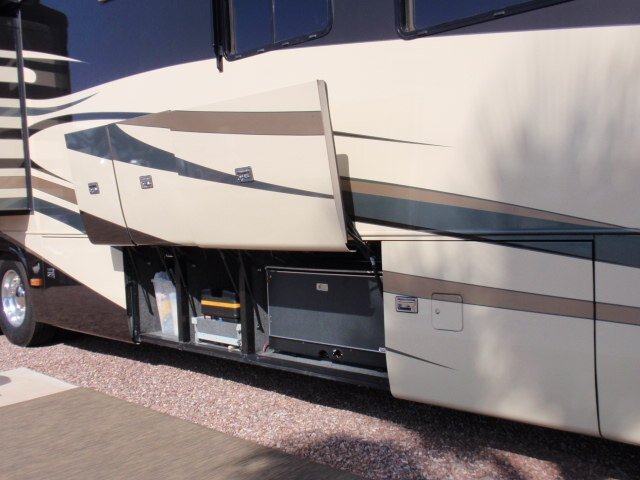
We did this. August, 2006. Optimum usage of the complete basement compartment. One of the many advantages of not having a curbside front slide. Complete utilization of patio area and access to basement compartments.


-
Are Nitrogen Filled Tires A Gimmick?
Paul J A replied to David Pratt's topic in General Motorhome Discussion
A personal choice is simply that. Ran out of popcorn, so your on your own. I meet a guy in Indio, Ca. in 11-2005 at a RV Park who was inflating his coach tires with a powertank.com . He was a distributor for the product. I purchased a 15# Tank and all the accessories for the use of it. I had the tank filled with Nitrogen, MY choice. It was amazing. Filled coach tires from 105# to 110# in less than -1- minute. I installed it in the coach basement, with quick disconnects, and used a 50' hose to air up the coach and toad from either side of the coach. The tank of nitrogen would last 1 to 1-1/2 years between refills, costing between 12-14$ at Gas Supply businesses around the country as we were Full Timers. I paid 495$ for it, and Sold it in Spring of 2014 for 350$. I would do it again -
Off Topic - Gathering Related - Debbie Hutto
Paul J A replied to Scotty Hutto's topic in General Motorhome Discussion
Thoughts and Prayers for a complete sucessful surgery and recovery. Paul & Sue Ackerman -
Remove Rock Guard?? Melted by Tailpipe in High Winds
Paul J A replied to Bill R's topic in General Motorhome Discussion
The advertising vanity flap is simply that. No functional purpose at all. I had a road gator , flew off of a trailer recap, go under the coach, hit it, and ended up in the engine compartment. Nasty and costly repair. Thru it in the dumpster, and continued full timing for another 8 years with out it. Had a Road Master Rock Guard on the front of the Toad. -
Use 12" strips of duct tape and place around the edge of the windshield and the leading edge of the coach entrance door. Remove 1 at a time and you will find the wind noise location. Clearance lights are a known problem too.
-
Do you know what these are ?
Paul J A replied to Mike Farquharson's topic in General Motorhome Discussion
And the really "GOOD" tech guys would give you thier cell phone # to call when you had an issue that you really needed help with. The P R was exceptional. Customer was not a word on a screen or a text message. Real people doing great things because they wanted to. Back then when you ordered a New Monaco Coach at a Monaco Int'l. Pre Rally to a FMCA Rally, thier name was placed in a drawing for prizes of Discount Certificates of, 1K, 5K and one at 10K$. We won the 5k$ one at a rally we ordered our 07 Executive at. -
Having spent some time at a FMCA Rally with a Michelin tire design engineer, i was informed of the following. The 315 tire product made by Michelin was created due to the constant side wall failure of the 295, in the application of trash, garbage, truck use. Being constantly overloaded and traveling to landfills, it was a warranty nightmare for Michelin. Initially Michelin published an inflation chart, showing inflation, using a 8.25" or a 9.00" X 22.5" wheel. I used 315's on 8.25" X 22.5" wheels on a 05 Dynasty also full timing 2 years, then on a 07 Executive for 8+ years, full timing, Be sure to READ ALL the information on page 26, in the Michelin Brochure available by opening the link. It states that ANY RV can use a 8.25" X 22.5" wheel for the 315, prior to ANY RV manufactuered before 1-1-2018. The brochure was published in 10/ 2021 Great information on tires and HOW to WEIGH your COACH. https://www.michelinb2b.com/wps/b2bcontent/PDF/RV_Tires_Brochure.pdf
-
You may want to address the weight issue as one complete unit, opposed to individual shelvels/drawer boxes/ or those wire baskets. A single track would be my primary concern, having to pull the entire unit out to access something you want. The shelf type lets you pull one out, with the others out of the way. Good luck with your choice. An obvious improvement from any.
-
Right on Ray. That is something everyone should do at NIGHT. Makes a difference in all seasons. FMCA had a session on that back in 2006 at a Rally in Pomona, Ca. H D and Lowes had a real run on the foam insulation.
-
Slide out rack/gear lubrication?
Paul J A replied to Ted Carbonaro's topic in General Motorhome Discussion
T-9 Boeshield is a very popular bicycle lubricant. -
George P ; The drawer slides have a detent in the slide, so when they are closed, it takes an effort of pulling force for them to cause the slide to extend. You will notice that we have certain types of containers of various ingredients on specific shelves. My wife is 5'-2" , so she arraigned the things on the shelves to meet her comfort. Adsolute use of the complete shelf. The door is latched with a sliding bolt. The lower one is a complete drawer, as you see it, and came that way from Monaco. We added the green container, for trash. Look to the left end/top of the green trash container. There is a sliding bolt there too. Both came with the coach from Monaco.
-
Closing the slides reduces the area that you wish to heat/cool.
-
Here is another option to consider. We put drawer slides on all the shelves in the coach.


-
Weight/Pressure per tire/TPMS/Tire Valve Extensions
Paul J A replied to millionroy's topic in Tires & Wheels
Yep. That's one of the benefits of having a tire shop that does lots of truck tires install your NEW tires.They always have them on hand, BUT, you usually have to ask for them. The rubber stabilizers that you insert into the openings in the outer dual are a good and essential thing to do. -
They are called bayonet style with 2 locking pins.


